Simulating Draft Strategies
Posted by R. Conroy, 2020-07-28
There have been a few different styles of drafting proposed over the years. Ben Stark’s Drafting the Hard Way is the seminal article on reading signals in draft by trying to intuit what your neighbors are drafting and why that leads to better results over the long run. He also introduces the terminology of drafting "the easy way": holding onto your first pick for dear life. A few years later, Ondřej Stráský introduced a middle ground concept in his article Drafting the Medium Way, which was later reinforced by Ryan Saxe in his article Maximizing For Your Own Preferences and on Lords of Limited as Drafting with Preferences. These takes suggest leaning into a subset of archetypes in a draft, either because you know they generally result in stronger decks, or perhaps because you’re just more comfortable with them. If there are any of these articles you haven’t read, I’d strongly recommend reading them as they present very helpful concepts useful to any drafter - the descriptions I've provided are vast oversimplifications of the information they provde.
There has been debate about which of these methods is best, and any of the authors would likely agree that it depends on many factors. When Drafting the Hard Way came out, it was pretty common for most people to be drafting the "easy way", and someone who was reading signals in the draft could often get a significant leg up on the others in their pod as a result. These days, with more draft content available than any one person could hope to consume, a lot more people are trying to read signals, and the benefit of doing so is lessened. If everyone is drafting the hard way, it becomes tough for anyone to read clear signals and can result in some weaker decks. If some people at the table are drafting with preferences towards a few decks, they can send better signals that other colors are open and wind up with stronger decks. However, if everyone believes UR to be best and leans into drafting it, those who don’t abandon ship can be left with pretty weak decks as the cards in their colors dry up. There’s a lot of interesting game theory at play here, though we won’t dive too deeply into that.
Through all of these articles, everyone has theorized what impact this may have on a draft and backed it up with their overall experience. It’s easy enough to see for yourself what happens if you try to use one of these techniques in any given draft, but no one ever seals the packs back up and runs it again with a different strategy. Today, however, we’re happy to be able to actually show you what happens if you do just that! Using all the data submitted by 17Lands users, we’ve developed draft bots that can simulate different personalities for us. To see what happens in these scenarios, we’ve put them all at a table together, trying out different configurations but keeping the same set of packs through these different iterations just to see what happens!
Let's Run It Back
For each of the simulations we run through, we’ll include a visualization of what profile is in each seat, and we’ll highlight the same seat across each draft to see the impact of their and other draft personalities’ choices. "E" indicates an easy-way drafter, "H" indicates the hard-way, and "P +XY -Z" indicates a preference for colors X and Y as well as a tendency to avoid color Z. At the end, we’ll also share with you a number of other different drafts and configurations with all of the draft viewers exposed so you can explore even more for yourself. With that background in mind, let’s get to it!

Our first configuration pits a table full of easy-way drafters against each other. You should take a look at the
draft viewer for the highlighted seat here. In this case, we
see the drafter take what was deemed the best common early on -
Next, we use those same packs, but have all the drafters set to do it "the hard way," including
our featured drafter. We can see an immediate difference in
pick two, with the drafter recognizing the strength of

Next, we see what happens when we mix easy- and hard-way drafters at the same table. In this case, our easy-way drafter doesn’t actually have as much of an option to get mixed up in blue or white and actually gets pushed pretty early on into green as their second color. The hard-way drafter passing to them better picked up that white was open, cutting off that avenue. While this draft isn’t necessarily much better or worse for our easy-way drafter, it’s still interesting to note that it winds up significantly different from the all easy-way drafting from our first scenario.
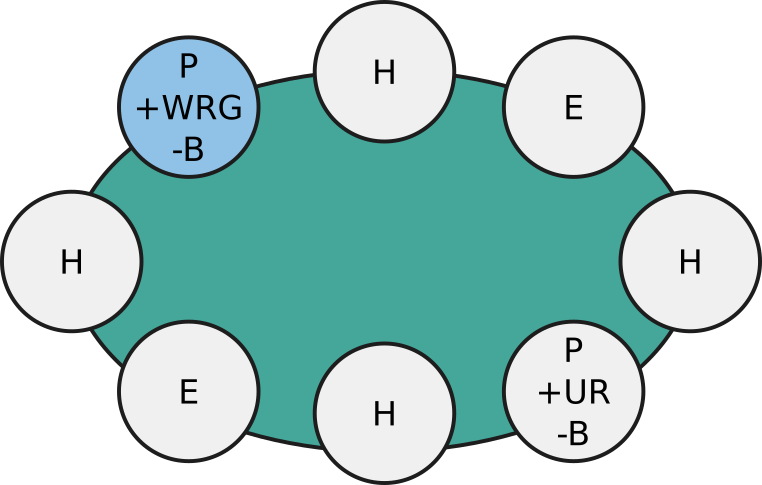
Lastly, we get to mix in drafting with preferences. In M21, the consensus seems to be that the Naya colors (white,
red, and green) are the strongest, as they have a deep roster of commons that contribute to the aggressive plan.
As such, we see what happens in that same seat with an early
preference towards these colors and a bias against black as the worst color. Perhaps unsurprisingly, we wind up
with a totally different deck. The drafter forces its way into WG early on, with red not having been flowing much
at all. Choices of
More to Explore
What we’ve described here is just one set of packs, and a couple of personality configurations. For those interested, we’ve generated quite a few more scenarios for you to peruse as outlined in the table below. Each link includes the bot personality and the final colors they ended up in. The scenarios described above are pack list "A".
While our draft bots don’t mimic human behavior perfectly, this sort of simulation serves as a great learning tool for the effects of these different styles. You’ll see plenty of cases where the preference bots get pushed out of the colors they want, and cases where the easy-way drafters end up in the same lane as if they drafted the hard way. Overall, though, these bots help illustrate some of the nuance that the top limited minds recommend.
Easy-way drafters will see a lot more volatility in their results. In some cases, like this one, you wind up with the nuts aggressive WR deck where your biggest challenge is figuring out all the cuts. In other cases, though, you’ll find yourself one of multiple UB drafters and wind up scrapping for playables. Hard-way drafters may need to bob and weave a bit before settling into the right lane, but they can be very rewarded for doing so in many cases. In other cases, drafting the hard way can wind up postponing the decision too far leaving you unsure what colors you are in or reading signals incorrectly just because the packs fall a certain way. Drafting with preferences will usually leave you with a good second pack if you’re able to force your neighbor to the right out of your colors, but you can also be filling your deck with a bit of chaff in pack three if the person passing to you is in your same colors.
It won’t be universally true, but in a pod full of easy-way drafters (perhaps your local FNM), drafting the hard way will usually yield the best results. In a pod of hard-way drafters (maybe your next MTGO draft), pushing your way into the best colors with preferences will wind up with a good deck. Put in too many preference drafters, though, and drafting the hard way will often take back the crown. The small sample of data we've provided here can't show this outright, but it's another step along the path to demonstrating these ideas and also perhaps better showing where they might not hold. Our next goal with these simulations will be to recommend a deck build from each drafted pool and estimate the strength of that resulting deck. If we're able to build a good version of that, you can be sure we'll run a much larger set of simulations and share the results.
Look forward to a future article, which will go into detail on how we configured these different personalities to enable these simulations! In the meantime, you can help us run more analyses like this one by using 17Lands to track your own drafts, or you can contribute to help keep the servers up via our Patreon page.